Thursday 30 May 2013

A very easy pattern for a very tiny bag.

I made this tiny bag to keep my earplugs in, to stop them getting separated or dirty. 
It's such a simple pattern, that I wasn't sure if it's worthwhile writing it down, but decided that it could help beginners if I did. So, here it is.

I "made" the yarn, by simply tying small pieces of other yarn together. The finishing result is bumpy, from the knots, so unsuitable for something like socks, where the knots would be felt, but perfectly good for something like this. I love the scrappy look it gives but, of course, you can use whatever yarn you want, with an appropriate hook size.

Crochet skills needed:
To be able to single crochet (I use american terms) and chain.

You will need:
  • Yarn (I used dk/worsted weight)
  • A crochet hook (I used a 4mm one, but just use whatever is suggested for the yarn)
  • A button (The size doesn't matter within reason, as it's easy to adjust the size of the buttonhole)
Start by making a slip knot, then chain until it's the width you want your finished product, then chain one more. I chained 9.

Now, single crochet in the second chain from the hook, then continue single crocheting in every chain along that side. 
When you reach the end, continue around it, and single crochet in every loop on the opposite side. 

Continue single crocheting in every loop until your bag is the desired length. No need to worry about rows, stitch counts,  or shaping; I told you it was easy!

When your work has reached the desired length (mine is 2 inches long), crochet until you're at a side of your work, with your current stitch directly over one of the bottom corners. 

Chain one, turn the work, and crochet back along the just-worked stitches, until you reach the opposite corner. 

Continue repeating like this, until the flap has almost reached the desired length. Now you're going to do the buttonhole. 

Take your button, and hold it infront of your work. Count how many stitches are needed to make the width of the button (erring on the smaller side). For me it was 3.

Count the amount of stitches you are working on the flap, subtract the number from the button, then halve it. I was working 7 stitches, so I subtracted 3, and halved it to 2. 

Chain one, turn, and single crochet that number of stitches. Now, chain for the amount of stitches appropriate for the button (making sure not to chain too tightly). Skip the same amount of stitches as you chained, and continue single crocheting to the other side.

Cut your wool and cast off. Now all you have to do is sew on the button and you're done. Congratulations!

Feel free to ask any questions, and I'd be happy to hear any feedback about the pattern. 
Happy crafting :)

Wednesday 8 May 2013

What I've been working on.

Here's an update on the projects I've been working on recently (the patterns are available via my ravelry page, and they're all free)

I made my granny this kindle cozy for her birthday, and I love how it turned out. It's even got a tag on, which I made recently! I'm planning on putting them on all handmade gifts I give.


You'll have seen this gloves partly-made in my previous post. I changed the fingers so I can type and use touchscreen devices in them, but otherwise followed the pattern, and they're really cozy and fit well!

Aaand a close-up!


 This is a hat I made my granny a while ago, and have taken it back to add a couple more "rolls" to the end, to make it longer. 


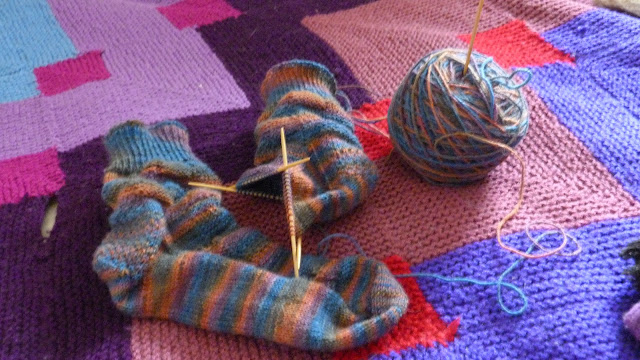
Aand last, but definitely not least.. my May Socks! I absolutely love the pattern, and the yarn (which I can thank my granny for, as it was a present from her), so these are probably my favourite socks so far! They look "crumpled" when off, due to the nature of the pattern, but they're not like that when worn. 
I'm so glad I've been able to use real sock yarn recently, as the resulting socks are just so nice. 
I'm hoping to finish them by the end of the day! But as I've got to go to a doctors appointment, and then recover from said doctors appointment, that may not be possible. 

I haven't been able to work much on my ripple blanket recently, as we've had a bit of a heatwave (for England, anyway), and it's just been impossible to have a thick blanket on my knees while making it. It's a bit colder now though, so maybe I'll make some more when I've finished my socks! 

I hope you've enjoyed my recent rambling posts, as I haven't had the brain power to put together anything more structured or useful.. but I'm still hoping to make a sock darning tutorial at some point, and even post my own (crochet) pattern for fingerless gloves!

Goodbye, and Happy Crafting!

Monday 29 April 2013

A tea cosy, a hat, and a glove (almost).

Just an update on a few of the projects I've been working on recently. 
I've also been working on a sock-mending tutorial, which I'll hopefully finish and upload soon!


Yumm, camomile tea.. (free pattern to be found here)


I absolutely love this hat, it's so warm and cosy (free pattern here)


I get very cold hands, especially in my fingers, and fingerless gloves which stop at the base of my fingers often just don't cut it. So I'm following this pattern for full gloves, and just stopping before the ends of the fingers, so I can still type and use touchscreen devices. I really love the pattern on it.

So, that's all from me for now, I'll post again soon! Happy Crafting x

Sunday 21 April 2013

Sunshine and socks.

Just a quick post, to say that I've finished my April Socks!
I took the opportunity of the sunshine to take some photos of them in the garden. I was going to sit in a new hammock (our old one was left out in the rain too orange, so didn't match anything), but it turns out the hammock stand needs adjusting, and it's rusted so we need to somehow get something inside to remove that and.. Yes, back to socks. 

They're so warm and cosy!


And I just love the pattern. (free link here)

I spent some good time outside, crocheting in the sunlight. Although it was definitely hot, this is still England, and it was nice to snuggle under my ripple blanket, while making it.

Since finishing the socks, I started a black and white, pleated tea cosy, which I'm sure I'll show you pictures of soon!
I've also been working on something that I can't show you quite yet.. But I shall soon write up a post all about it, and schedule it to post when the time is right!

Happy Crafting!

Tuesday 16 April 2013

The blanket and the cushion,

went to sea, in a beautiful pea green boat.

Actually, I am storing the wool in a green box, but I wouldn't really call it "pea green".

Also, "blanket-to-be", as it's not finished yet.

I've been obsessed with ripple blankets for quite some time; drooling over pictures of them on the web, and working out colour schemes, but I never quite got round to making one of my very own.
Until now.


This cushion was originally the beginnings of a single-bed blanket. I then realised that, as I'm soon upgrading to a double bed, making a single blanket was a little silly. I folded what I've done in half, sewed the top and bottom (with the waves fitting into eachother, so it lays flat), stuffed it, and voila. A cushion to match the soon-to-be blanket! 

Fortunately, due brain fog, I'd already originally ordered enough wool for a double blanket. 

Whoop.

The next problem was that I'm quite an impatient crafter, and I think that crocheting an entire double blanket with a 5mm hook might be the death of me. So I decided to hold the wool double, and use a 9mm crochet hook.

Mmm, very cozy and warm. and it's going so quickly! It's also reached a length that can be snuggled under, while making it, so it's my go-to project if I'm feeling a little chilly!


You might recognise this picture from the top of my blog! 
I hope to finish it in the next few weeks, if I don't get distracted by other projects, but I'm enjoying every minute of making it.
Oh, and I used this pattern.

Happy crafting!

All socks bright and beautiful.

I'm a terribly naughty blogger, I know. In fact, it's been almost a year since my last post (now deleted, to give a fresh start), as I decided to give the whole blogging thing a bit of a rest.

However, I'm now back, inspired, and eager to get back into blogging. My blog's been re-vamped, and I decided to kick-start my blog with a post about my favourite things ever. Yep, you guessed it; Socks!

I've never quite been able to put into words what I love so much about them, but you've gotta admit, they're pretty spectacular. So, here are (almost!) all the ones I've ever made. Hopefully, in chronological order!
There were the first socks I ever made. As I didn't know anything about sock knitting, I didn't find a very good pattern, and later went back and redid the toes. Weaving in all those yarn ends was a nightmare!
There were the second socks I made. I made them two-at-a-time, and toe-up. Stripes are awesome.

These were my mums first "birthday socks". Admittedly this tradition has only been going for two years, but I've given her socks 100% of birthdays within that time!
These were the first socks I made with real sock yarn (instead of the acrylic dk that most of these are made from). It took a while, but I made up the pattern, and I really love them.
These are my "January socks", made this year. I've started making one pair a month, so by the end of the year I should have plenty to keep my feet toasty and warm! (top down, acrylic dk, I improvised the pattern).

These were my mother's "birthday socks" from this year. The pattern is called "Jeeves" and is based on the P.G.Wodehouse books she's so fond of! (find the free pattern here)


This is, ermm, one of my February socks. The other is lost in the wash camera shy. 
(find the free pattern here)


These are my march socks for this year. Oh, how I love colour-changing, dk weight, acrylic. Quick, cheap, and easy to wash!


And finally, these are the socks I'm currently working on. Yep, I think they're just beautiful. 
Fancy a close-up?

They're made with trekking xxl sock yarn, and follow this free pattern.

Well, that seems to be just about it for socks. I'll leave you with these pictures of my cats, enjoying the recent (unexpected) heat-wave-ish-thing-that-wasn't-really-that-hot.